Saturday, July 18, 2009

Mass Maintenance of Purchase Order

There are situations in real life scenarios, when transactional data needs to be updated en-mass. This could arise due to change in material specifications, vendor terms etc. To update each and every document, one by one would be time taking, prone to errors and very tedious. To simplify this, SAP has provided utilities to update certain transactional data en-mass.

This article highlights one such mass maintenance utility for updating Purchase orders in bulk.

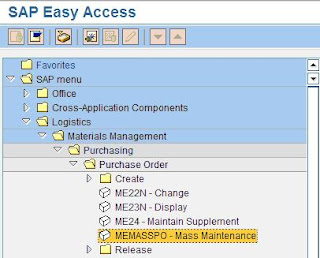
Go to T Code MEMASSPO.


Let's say we want to update Purchase Order Line Items. Select the line as shown below.
Click on Execute Button.

Enter the Purchase Order Number. If the purchase orders have multiple line items, only those purchase orders should be entered here which need maintenance of the same line item.


Click on Select Fields button.


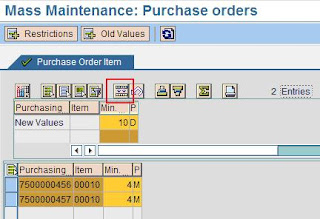
Select the fields in the screen above which you want to mass maintain.


Select both the columns and click on mass update, as shown below.


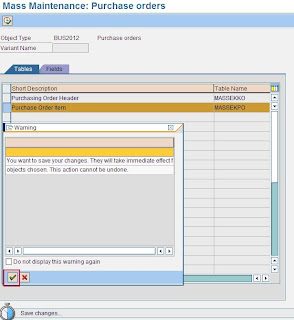
Click on SAVE.

Click on the check box.
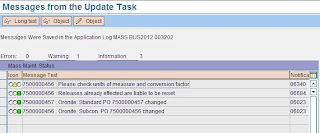
Below is the update log.

How to Control Inspection Lot Creation

This article explains the setting required to control Inspection Lot creation for Purchase Order / Production Order or Process Order.

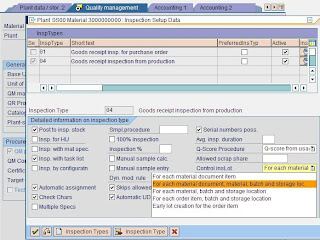
In the material master > QM view of the material, click on Inspection type and the following pop-up screen will open.


The field “Control insLot” controls the behavior of Inspection Lot creation.
  • For each purchase order item, batch and storage location – only one inspection lot gets created. Even if there are multiple Goods Receipt on the purchase order line.
  • For each material document, material, batch and storage loc. – for each partial GR a new inspection lot is created, even if the batch is the same.

The following screen shows the settings for a Production Order / Process Order.


  • Early lot creation for the order item – It means when a process / production order is released an inspection lot is created. This setting is particularly useful if there are in-process inspections.

Solution Manager at a Glance

Solution Manager, as the name suggests is used to manage the entire IT Solution landscape for an organization. Solution Manager can be used to manage SAP as well as non SAP applications. SolMan has applicability in all kinds of SAP projects viz. implementation, rollout, support or upgrade. It supports all phases of a project by using appropriate pre-delivered roadmap. Apart from projects, SAP solution manager is also used for Solution Monitoring, Service Delivery (operations) and Service Desk (for steady state support).

The following is a typical transaction / process sequence while using solution manager,

• T Code – SOLAR_PROJECT_ADMIN
This transaction is used to create a project and assign a roadmap. While creating a project, a project type needs to be selected. The different types include, Implementation, Template, Optimization Project (for SAP services), Safeguarding Project (for critical situations) and Upgrade Project. Project language is also determined at the time of project creation which can not be changed later.

• T Code – RMMAIN
This transaction enables the user to see the roadmap in a graphic form. It basically outlines the roadmap in terms of deliverables, milestone and services for each project phase.

• T Code – SOLAR01
This transaction is used during the business blueprinting stage. It is divided into 4 groups viz Org Unit, Master Data, Business Scenario and Interface Scenarios. The business scenario group is further subdivided into Org Unit, Master Data and Business Process. Under business process the various steps / tasks are defined which generally include the logical sequence of transactions codes which need to be executed to cover the business process.

The Org Unit and Master Data under a business scenario are meant for business scenario specific data.

The data from this transaction is used in all subsequent phases of the project.

• T Code – SOLAR02
This transaction is used during Realization / Build phase. It uses the structure created in SOLAR01 to add further details. The user can add transactions for each business process, Configuration Nodes for configuration items, Test Cases, Business Configuration (BC sets) sets etc. SOLAR02 also provides access to create new test case or a new BC set from the same transaction.

SOLAR02 is also used to add training material for each business process along with the end user roles for which it is applicable.

• T Code – STWB_2
This transaction is used for Test Plan Management. It is used during Integration testing. Test plan(s) corresponding to a project are created by this transaction. Based on the test cases defined in SOLAR02, applicable test cases are identified and then a test package is built. This test package is assigned to the end user who is responsible for testing.

STWB_2 can also be used to monitor messages created during testing by users. It also provides a status overview of the test cases. For instance how many have not yet been tested (No Result), how many are in error and how many have been passed (OK).

• T Code – STWB_WORK
This transaction represents the testing workbench. It is used by users responsible for testing the SAP solution. It provides a user specific worklist based on the test package assined in STWB_2. The tester can run the test transaction from this workbench and then update the test status like No Result or Error or OK. If required, the tester can also create a message and assign to another person, for a particular test from this transaction. The progress of these messages can then be monitored using STWB_2.

• T Code – STWB_SET
This is used to initialize test workbench for testing and to set additional parameters for message handling during testing.

• T Code – SOLAR_LEARNING_MAP
This is used to create a learning map assigned to a project. It is usually in the form of chapters with documents assigned to each chapter. The end users can see this using a browser link and provide their feedback on the training content from the same web page window. This transaction also provides means to analyze end user feedback on training and to monitor the usage of the training link(s) based on the number of hits.

Additional Transactions:

• T Code – SMSY
This is used for system landscape management. The system landscape consists of Logical Components. Logical components include a set of logical systems along with their system roles with the applicable product version.

• T Code – SMSY_SETUP
This transaction is used for system landscape data collection.

• T Code – SOLAR_EVAL
This transaction is used to auto determine upgrade relevant IMG activity and documentation for configuration and business process.

Sunday, January 25, 2009

Batch Management

Batch management is used to identify one lot of production from another. This helps in tracking the lots during their life-cycle, as well as recording the unique characteristics of each lot. For instance, the expiry date or date of production of 2 lots can be different.

Batch Management can be applied to both process and discrete manufacturing industry. It is tightly integrated with all business processes viz., procurement, manufacturing, sales and inventory management. Some of the prominent functionalities supported as part of standard SAP batch management process are as under:
• Batch Specification / Classification - Classes can be defined for a batch and characteristic values can be entered accordingly.
• Auto Batch Creation – Batches can be configured to be automatically created as part of certain standard SAP processes.
• Batch Determination - This provides an automatic batch search technique based on pre-defined criteria. It is useful during Goods Issue and SAP condition technique is used to configure this. It also helps in searching for batches using specifications.
• Batch Status - it specifies whether the batch is active, can be used further etc.

Configuration Steps:

Step 1 – Click on the link below “specify batch level and activate status management”.


The first setting is, at what level the batch number should be unique. The default setting is as below,

The advantage of having batch unique at material level is, the batch number remains consistent during stock transfer between different plants. Next the batch status management is activated,

The node “initial status of a new batch” allows to set the status as “restricted” when a new batch is created. If there is no check mark against “initial status” as shown in the figure below, the stock remains unrestricted. This setting is at material type level. The check box may not be required to be set in case Quality Management is active. With QM, the stocks are anyways inspected, so putting them into restricted would increase one more step of bringing them from restricted to quality inspection stock.

The node “plants with batch status management” will be required if batch level is at plant level.
Step 2 – Activate batch number assignmentThe batch number can be internally assigned or externally assignment. Depending upon the business requirement, it can be configured.
Step 3 – Creation of new batchesThe new batches can be created automatically by the system or manually vide transaction code MSC1N. To create batches automatically during certain transactions / movement types, follow the path to the following node in configuration:

The node "define batch creation for production order / process order", allows you to configure for a combination of plant and production scheduling profile. It specifies whether a batch is created automatically at production order creation or production order release or no batch creation at all. Similarly “batch creation for goods movement” controls the batch creation for each movement type. The next node controls the batch creation for each material type, as shown below.

Step 4 – Batch ValuationThis step is used to maintain batch characteristic values while creating batches in the background (automatically) or manually in the foreground. Batch characteristics are also useful when batch determination functionality is required during goods issue. The batch anyways inherits the material characteristics / class for which it is created.

Step 5 – Batch DeterminationIt uses the standard sap access sequence search strategy. Over here, strategy type is like condition type in pricing. The following screen shows how to set it up.

Click on the above node and the list of existing strategy types will appear.
A new strategy type can be created here, preferably a copy of one of the existing strategy type. These strategy types are then used in “Batch search procedure definition” as shown below.


The batch search procedure configured above, now needs to be allocated to IM movement types.

Step 6 – Define Sort RulesThis step determines, as the name suggests, a rule is created to sort the batches during batch determination. This sorting happens based on the characteristics defined for the batch.
Step 7 – Master Data SettingIn material master, “batch management” indicatory needs to be set if the material is to be handled in batches.
The condition type / strategy type for batch determination needs to be maintained. The T Code for the same is MBC1.
The key combination displayed above (for T Code MBC1) is as per the access sequence configured under “batch determination and batch check”.
Shelf Life Expiration Date Check:
This can be enabled as per the node below.
The system allows the date check to be activated at Plant Level and at Movement Type Level.

Logistics Invoice Verification

Logistics invoice verification is the final step in procure to pay cycle. It begins with the vendor submitting the invoice for the goods sold. The Accounts Payable group, after receiving the invoice from the vendor, enters it in SAP. Based on the Purchase Order details, Goods Receipt, invoice data and configuration settings, the system prompts the user with messages. The user then takes one of the following action:
• Park / Save the invoice
• Post the invoice

Park / Save the invoice allows user to make changes later on, so that it can be posted. Once posted, the invoice is released to accounting for payment. Under certain circumstances, depending upon the configuration, the invoice can get blocked upon posting. It means that until the block is removed from the invoice document, it will not be released to accounting for payment. There is an alternative way to carry out Logistics Invoice Verification. The process is called Automatic Settlement or Evaluated Receipt Settlement (ERS). In this process, instead of vendor submitting the invoice for payment, the company creates an invoice document (based on the purchase order and goods receipt). This document is then used as the basis for payment by the accounting team.

Frequently used transactions:
MIRO - Enter Invoice
MIR7 - Park Invoice
MIR4 - Display Invoice Document
MR8M - Cancel Invoice Document
MRBR - Release Blocked Invoices
MIR6 - Invoice Overview Automatic Settlement
MRRL - Evaluated Receipt Settlement (ERS)

Invoice BlockingInvoice is blocked either by the system automatically or manually. The reason for blocking is usually a high variance between the PO data and Goods Receipt data as compared to the details mentioned in the invoice document. If an invoice is blocked, all the items are blocked; even if the block is applicable to a particular line item. Invoice block needs to be removed on time particularly if the invoice includes a cash discount. Delay in releasing the invoice may cause expiry of cash discount, if applicable. The most common variances which are encountered during invoice processing are:
• Quantity VarianceThis generally relates to the difference between quantity received and invoiced by vendor. Or quantity in the purchase order and invoiced by the vendor.
• Price VarianceThis refers to the variance of per unit price as compared to the purchase order.
• Schedule VarianceThis is generally invoked if the date of invoice entry is earlier than the delivery date in the purchase order.

The variances can be configured and activated as per the company posting rules. Setting up these variances helps in two ways. It allows the invoices with minor differences to go through so that a lot of time is not wasted on small differences. At the same time, these variances stop invoices from financial payment when the difference exceeds company standards thereby providing a strong control in the process. There is a different kind of block, 'stochastic block' which is sometimes implemented by the Accounts Payable group. It means that certain invoices will be blocked for payment at random, so that they can be checked again. There will be no particular reason for blocking and the block will not be at any line item level. If it is set, there will be an "R" in the payment block field in document header data. It is usually based on 'threshhold value' and 'probability'.

Configuration Setting for Tolerance Limits:
Tolerances are defined in customizing to configure which variance to be accepted and which one to be blocked. Tolerance limit for invoice block is set at company code level. The Tolerance limit for each company code is specified here for each Tolerance Key.

The following screen shows how to set it up for tolerance key “PP” – Price Variance. It says that tolerance key PP is active for company code 2600 and the lower limit for tolerance is 5% and upper limit is $ 100.
There are also situations when the invoice, though within tolerance, is entered with a large amount. It is then recommended to block the invoice to check the amount. It can also be applicable to cases when invoices do not refer to any purchase order. To activate this check, tolerance key “AN” - Amount for item without order reference and “AP” - Amount for item with order reference, need to be configured. Subsequently the following node “Activate Item Amount Check” needs to be activated.


Configuration Setting for Stochastic Block:


In the step "Activate Stochastic Block", stochastic block is activated at company code level for desired company codes. The next step is "Set Stochastic Block" and here "threshold value", "currency" and "percentage" is entered to set the stochastic block on invoices. If the invoice value exceeds threshold value, based on the percentage (probability) block will be set on the invoices. If the invoice value is lower than the threshold value, the percentage (probability) gets reduced in proportion to the invoice value and accordingly a block is set on the invoices.

Example
Threshold value: $6000 Percentage: 50

Invoice valuePercentage or probability of a block

$7000

50 %

$8000

50 %

$3000

25 % (= 3000/6000 * 50)

$300

2.5 % (= 300/6000 * 50)


Releasing Blocked Invoices
The invoice block needs to be removed before any payment can be processed for the vendor. To remove the block, invoices can be released individually, collectively and automatically.
T Code - MRBR
Process
• Enter the selection criteria to select the desired invoices for processing.
• Process the invoice list by removing individual blocking reasons. This could be a result of workflow between buyer and Accounts Payable specialist.
• The invoice is then released, either by the buyer or the Accounts Payable resource.
Monday, September 1, 2008

What is SAP R/3

SAP in English stands for Systems Applications and Products in Data Processing. "R" in R/3 represents Real Time Integration and “3” stands for 3 tier architecture.

SAP allows an enterprise to integrate all their business operations in one system for Planning , Controlling, and Monitoring. The SAP R/3 system consists of application modules that support business transactions and are integrated real-time. Because of integration, a change in one application module will result in an automatic update of the data in the other application modules involved. All application modules have common architecture and user interface. In other words, a person familiar with one module, will have little difficulty in understanding other SAP modules. The SAP screens in general, across modules, have same “look & feel” and navigation.

Some of the commonly used SAP R/3 application modules are:
  • Financial accounting and Controlling (FICO)
  • Materials management (MM)
  • Sales and Distribution (SD)
  • Production Planning & Control (PP)
  • Asset management (AM)
  • Project system (PS)
  • Human resources (HR)
  • Plant maintenance (PM)
  • Quality management (QM)
  • Warehouse Management (WM)

SAP also has Industry Solutions which combine the SAP R/3 framework and application modules alongwith additional industry-specific functionalities. Special processes, techniques and modules have been developed for almost all different industry types such as oil and gas, mining, pharmaceuticals, retail, banking etc. which makes SAP relevant for all kinds of businesses.

What is an ERP

ERP stands for Enterprise Resource Planning. The word enterprise means a business, a company or an industry, all its processes and functions in entirety. Resources stand for people, raw material, finished goods, capacity, factory, money etc. of the said industry or business. In any organization there is usually a constraint on resources; Planning therefore represents the activity of utilizing resources to the extent possible so as to maximize the enterprise benefits.

ERP is business support software which is used enterprise wide. It captures all the enterprise processes across all functional tracks in one single data base. Entire organization runs on one software.

ERP solutions have a modular structure. Each of the business functional tracks is usually represented by a separate module. For instance, Materials Management, Human Resources, Finance and Controlling, Sales and Distribution, Transportation Management are separate modules in an ERP solution.

ERP – Characteristics
  • All data available in central database. It is updated and available real-time.
  • One point entry of data
  • Best business practices inbuilt
  • Modular system. This enables to implement only required functions. Other functions can be integrated later.
  • Transparency and Control to extent required
  • Managers can utilize more time in analysis and less in coordination

ERP Vendors
There are several vendors which provide ERP solution. Some of the leading ones are as under,

  • SAP
  • Oracle Applications
  • Microsoft Dynamics
  • The Sage Group
  • Ramco Systems etc.

SAP is the market leader in ERP solutions. Its closest competitor is Oracle Applications which stands as a distant second to SAP.

Tuesday, August 26, 2008

Valuation Type - Split Valuation

SAP allows material to be valued at plant level. This helps in valuating a given material with different cost based on the procurement / manufacturing cost at the plant. But there are situations when there is a need to have different valuation of a given material even at plant level. A most common example of such a situation is, when the same material is produced in-house as well as externally procured. An externally procured material would obviously have a different price than an in-house produced material. The organization might also want to track the two types of stock separately so as to have a better visibility of the stock in hand.

To configure such a business scenario in SAP, split valuation is used. By this, a different valuation type can be assigned to a material which for instance will indicate whether it was in-house produced or externally procured.

If split valuation is enabled, any inventory movement transaction should have the valuation type details. By moving material of a specific valuation type, only details of that valuation type are affected. All other valuation types of that material remain unaffected.

Configuration Setting:

1. SPRO> Materials Management> Valuation and account assignment> Split Valuation> Activate Split Valuation – T Code OMW0
Activate the split valuation and save.

2. SPRO> Materials Management> Valuation and account assignment> Split Valuation> Configure Split Valuation – T Code OMWC
This is the main screen for split valuation configuration.
  • Click on “Global Types” to define new valuation types.
    There will be a list of existing Valuation Categories displayed in the screen. To create a new Valuation Type, click on the ‘Create’ button. Enter the Valuation Type name and other details as required in the screen. For instance if External Purchase Orders are allowed for this valuation type or not, Account Category Reference etc. Click on ‘CREATE again so that valuation type gets created.
  • Click on “Global Categories” to define new valuation category.
    There will be a list of existing Valuation Categories displayed in the screen with respectively assigned valuation classes. To create a new Valuation Category click on the CREATE button. Enter the Valuation Category name and enter the default Valuation Types in this screen if required. Click on ‘CREATE again so that valuation category gets created.
  • Now Activate the Valuation Category. Go to the main screen of the OMWC transaction. Click on the ‘Local Definitions’ button. This will display the list of all the plants. Select the plant for which you want to activate the above ‘Valuation Category’. Place the cursor on that plant and click on ‘Cats. -> OU’ button. This will then display the list of all the available valuation categories. From this list of all available valuation categories, select the valuation category which you have created just now by placing the cursor on it. Now click on the ‘Activate’ button to activate it. After doing this, you should be able to see the status as ‘Active’ under Status column. Click on the SAVE button.

Material Master Setting:

1. Create the material master with material subject to split valuation. Click on the ‘Accounting 1’ view of the material master and enter the ‘Valuation Category’ as applicable.

2. Update the price as Moving Average Price since there will be more than one price for that material.

3. SAVE the material and extend the material for the same plant with the desired valuation type(s).

Wednesday, August 20, 2008

SAP Note / OSS Note


OSS Note

OSS Notes or SAP Notes are used to change standard SAP objects / programs. This is usually required when a bug is identified in vanilla SAP functionality, i.e. an SAP functionality with no customization. The OSS notes are released by SAP on a periodic basis. These notes reflect the problems faced by some other customer of SAP and the solution thereby arrived to mitigate the problem. As a result these notes contain instructions, workarounds to a problem or links to support packages that might need to be installed in order to solve the problem.
An SAP note is identified by a unique number. A note typically contains details like version of the note, instructions to apply the note and the SAP releases for which the note is valid. It also provides the prerequisite notes / support packs which need have to be implemented before the note can be applied.

How to search OSS Note / SAP Note

There are two ways to approach this,

The search usually begins with entering few key words that identify your problem and clicking on the Search Button. Typically used search terms could be SAP functionality name, program / object name, error message etc. This search will throw a list of notes which resemble the search terms. From this list identify the applicable note and download it. If the note is big, “download manager” might be required to download the note. Download manager can be installed on your computer from the same website.

In case, you do not find any applicable note based on your search, you will have to submit a problem to SAP. Based on the criticality of the problem, the SAP team would analyze it and provide a solution.

PS: To search for any OSS note, a logon ID and password is required.

How to apply an OSS Note / SAP Note

T Code – SNOTE

Steps:

  • Download Note or Upload Note (if it is already downloaded)
  • Update Process Status
  • Read Note instructions (Optional Step)
  • Implement Note
  • View implementation Log
  • Update Process Status to ‘Complete’

Benefits of SNOTE:

  • Makes it easier to implement OSS Note / SAP Notes.
  • It applies the note if SAP object already exists. If the object does not exist, it needs to be created manually outside SNOTE transaction.
  • It validates the prerequisite note requirements and prompts users accordingly.

Please refer to the SNOTE guide available at http://service.sap.com/. It is important before applying any OSS Note / SAP note to read it fully and understand all its implications. It also requires a lot of testing before the SAP Note is promoted to production. The error could arise if the note is not applied correctly or if it is interfering with any other SAP functionality or a custom functionality being used in the given landscape.

Saturday, August 16, 2008

Quality Management

Quality Management
The transaction processing for Quality Management module basically revolves around two important transactions,
  • Inspection Lot
  • Quality Notification

An inspection lot is usually created automatically, as a result of goods movement. The system uses the following configuration / master data controls to determine when an inspection lot is created and how it is processed,

  • Inspection lot origin
  • Inspection type
  • Inspection settings in the material master record

Usual triggers for an inspection lot creation are:

  • Material received from a vendor
  • Material received from a production order
  • Material received as a result of stock transfer
  • In process inspection based on Production Order routing
  • Quality Notification
  • Quality Inspection for a delivery

The master data elements in QM module are as under:

  • Quality Info Record
  • Quality Inspection Plan

Dynamic Modification Rule

Dynamic Modification Rule allows users to carry out inspection in a dynamic way. DMR allows scope of the inspection to change based on the past inspection results for that material.

In a typical dynamic modification rule, say for usage decision, several stages are created. An inspection lot, when created, belongs to one of the stage in the Dynamic modification rule. As per this stage, it is decided whether it is a skip lot or inspection is required. It can also state what kind of severity is required in the inspection process. Based on the inspection outcome of this stage, new stage may be assigned to the next inspection lot created for the material / vendor combination. As a result dynamic modification creates a path how an inspection lot is supposed to move through different stage based on the outcome of the inspection.

Quality Notification

A quality notification is created when a material is observed, at any stage of the manufacturing process, short of quality standards. The quality notification captures the object’s nonconformance with quality requirements and contains a request to take appropriate action.

Procurement - Quality Management (QM)

Procurement using Quality Management
If a material in Purchase Order has Quality management active, when a Goods Receipt is made the stock gets posted to inspection stock. An inspection lot is created usually automatically. The properties of the inspection lot depend on the following settings,
  • Inspection Lot Origin
  • Inspection Type
  • Inspection Settings in the material master record

An inspection lot, forces a user to carry out an inspection. The inspection needs to be carried out as per the Quality inspection plan. The inspection results are recorded for each of the characteristics. Based on the inspection results, a usage decision is made which basically completes the inspection process.

SAP Process Flow:

  • Purchase Order (ME21N)
  • Goods Receipt (MIGO)
  • Result Recording (QE51N)
    o Fill up the selection parameters and execute.
    o Select desired inspection lot
    o Select the inspection operation
    o Enter results for inspection characteristics
    o Close the inspection characteristics
  • Usage Decision (QA11)

The usage decision specifies whether the inspected goods are accepted or rejected for use. Usage Decision creates a material document. It results in a stock being posted as unrestricted stock, blocked stock or as returns delivery to the vendor. The stock can be posted as returns delivery to the vendor only if the vendor payment for the purchase order is still pending. Else it needs to be posted as blocked stock.

Usage decision is a final step in an inspection process. Once a usage decision has been made you can not change the inspection results.

Note:
If the inspection lot created after Goods Recipts (MIGO) is not released, an additional step will be required. By T Code – QA02 the inspection lot can be released so that results recording can take place by transaction QE51N.

Master Data Settings:

  • Material Master
  • Quality Info Record
  • Quality Inspection Plan

Evaluated Receipt Settlement - ERS

Evaluated Receipt Settlement (ERS)

Evaluated Receipt Settlement is an alternate way of processing vendor invoices. In this method, instead of vendor submitting the invoices for payment, the company on its own settles the vendor liabilities and presents a payment statement. This method of payment takes the data based on purchase orders and delivered quantities to arrive at the vendor payment amount.

The ERS process gives best results when pricing and goods receipt remains consistent with the Purchase Order created.

ERS has gained popularity owing to the following obvious advantages,
  • Reduction in manpower to process invoices
  • Timely payment to vendors

SAP Process Flow:

  • PO (ME21N) – A tax code should be maintained in the purchase order.
  • Goods Receipt (MIGO – Mvt Type – 101)
  • ERS Settlement (MRRL) - One can do test run to see the details and thereafter uncheck the test run and do a final run.
  • Payment Run
  • MR90 (Output messages in logistics invoice verification) – in case there is a requirement to re-send the ERS output message to the vendor.
    Purchase orders which are ERS relevant can only be settled through Evaluated Receipt Settlement transactions (MRRL) in Logistics invoice verification.

To cancel an invoice created through ERS you should first cancel the Goods Receipt and then create invoice through MRRL run, so that accounting entries can be reversed. In a similar manner credit memos can also be created using ERS. If an invoice has already been posted for a goods receipt and goods have since been returned to the vendor, the system on its own generates a credit memo for the returned quantity during the next MRRL run.

Master Data Setting

Vendor Master:

  • Purchasing Data tab
    o GR-Based Inv. Verif.
    o AutoEvalGRSetmt Del.
    o AutoEvalGRSetmt Ret

Purchase Info Record:

ERS relevant settings can also be activated / deactivated in a purchase info record for a vendor material combination. The advantage of this setting at Purchase Info Record level is it allows you to prevent certain materials from a vendor as being not relevant for ERS. In other words, Purchase Info Record settings are considered first while defaulting data to a purchase order as compared to vendor master settings.

Output Conditions:

T Code - MRM1 (Create output – condition records: Invoice Verification)
o Output Type = ERS
In this step, you define the message types for ERS. The system can generate and possibly send a message to inform the vendor(s) about the transaction settled, depending on the settings in Customizing. The customizing path is as under:
SPRO>Materials Management> Logistics Invoice Verification> Message Determination > Maintain Conditions

In case re-messaging is required, it can be done using transaction code MR90.

Stock Determination during Goods Issue

Stock Determination
Automatic stock determination is useful if a similar material is sourced in multiple ways. In other words, when a special stock of a material exists (consignment stock) along with an unrestricted stock, it helps to determine which stock should be picked up first for Goods Issue.
For instance, a priority can be set that own stock is to be issued first and when it is completely consumed, vendor consignment stock can be issued. In such a case stock is directly issued from vendor consignment stock instead of a 2 step process of stock withdrawal and then issue. For example, movement type 201 K directly issues vendor consignment stock to production order cost center.

T Code : OSPX
Configuration Path: SPRO > Materials Management > Inventory Management and Physical Inventory > Stock Determination > Determine strategies for stock determination.

Master Data Setting:
In Material Master, MRP 2 view, maintain Stock Determination Group.

Configuration Setting:
Maintain Stock Determination Rule in movement type setting, T Code – OMJJ.

Physical Inventory

Physical Inventory Process

This process captures different ways of carrying out physical inventory count in a plant / storage location. Depending upon the number of materials and company’s inventory norms, a physical inventory procedure is adopted. Following two procedures are more commonly used in industry:
  • Cycle Counting
  • Periodic Inventory (usually Annual Inventory count)

In Annual physical inventory, all materials are counted once in a year on a pre-determined date. On this date, all materials are blocked for any inventory movement till the physical inventory count is complete. This is more common for Plant / Storage locations which do not hold too much inventory. For warehouses with a lot of inventory, this method tends to become impractical to implement.

In cycle counting, all materials need not be treated the same way. It allows fast moving materials to be counted more frequently than slow moving materials or high value items to be counted more frequently than low value items. A cycle counting indicator is set in material master which determines for a given plant, how frequently the material has to be counted, as in, once a year, twice a year, thrice a year and so on.

SAP process flow:
1. MI01 – Create Phsical inventory document : Initial screen
2. MI22 – Display Physical Inventory Documents for material
3. MI21 – Print physical inventory document
4. MI04 – Enter inventory count: Initial screen
5. MI20 – List of Inventory Differences
6. MI11 – Enter recount: Initial screen
7. MI22 – Display Physical Inventory Documents for material
8. MI21 – Print physical inventory document
9. MI04 – Enter inventory count: Initial screen
10. MI20 – List of Inventory Differences
11. MI07 – Post inv. Differences: Initial screen

While creating physical inventory document in Step 1, material can also be blocked for posting. Otherwise transaction MI32 can be used after Step 1 to block the materials.

Steps 6 to 10 above are optional. If re-count is required then only these steps need to be carried out. Step 11 creates a material document, which leads to updating of SAP book inventory. In other words Step 11 leads to write-on or write-off of inventory based on physical inventory count.

SAP also provides T Codes to automate the process carried out in Step 1. By these transactions Physical Inventory Documents can be created in background in batch processing mode. MI31 enables creation of Physical inventory documents in bulk based on selection parameters for Periodic Inventory Count. Similarly MICN enables bulk creation of physical inventory documents for Cycle Counting.

There is an alternate ways of processing inventory count, where inventory data can be entered without reference to any physical inventory document, as mentioned below:

  • MI09 – Enter count w/o reference to document: Initial screen
  • MI20 – List of Inventory Differences
  • MI07 – Post inv. Differences: Initial screen

Master Data Setting – Cycle Counting

  • In Material Master Plant data / stor. 1 view maintain the “CC phys. inv. Indicator”.
  • MIBC – “ABC Analysis for Cycle Counting (Phys. Inv.) can be used to assign materials to different cycle counting categories viz. A, B, C and D. This transaction analyses the materials based on the configuration of category A, B, C and D and proposes / assigns a corresponding cycle counting indicator.
  • If “CC fixed” indicator is checked in Material Master Plant data / stor. 1 view, “CC phys. inv. Indicator” cannot be changed by running MIBC.

Master Data Setting – Periodic Inventory

  • In Material Master Plant data / stor. 1 view, “CC phys. inv. Indicator” should be blank.

The above two processes can also be used to count physical inventory of special stocks such as Consignment Material as well as different stock types like Quality Inspection Stock and Blocked stock.

To count physical inventory for say consignment material, maintain “K” in special stock field in the physical inventory document. To include different stock types like Quality Inspection Stock and Blocked stock in physical inventory process, you need to enter a new line for the same material in physical inventory document for each stock type.

Transfer Posting Scenarios

Stock Transfer from Quality Inspection (QI) to unrestricted use
T Code – MIGO
o Transfer Posting – Others - Movement Type = 321
o Enter Material, Quantity, Plant, Storage Location etc.
o Check and Post the document

Stock Transfer within a plant from one storage location to another
T Code – MIGO
o Transfer Posting – Others - Movement Type = 311
o Enter Material, Quantity, Plant, Storage Location etc.
o Check and Post the document

Goods Issue from Inventory to Cost Center (Manufacturing Consumption)
T Code – MIGO
o Transfer Posting – Others - Movement Type = 201
o Enter Production Order, Material, Quantity, Plant, Storage Location etc.
o Check and Post the document
NB – this can usually be posted if the material belongs to unrestricted use stock.

Normally the consignment material is a component in the Bill of Material (BOM) which goes into the manufacturing of the final/main product. This means that a consignment material is issued to a Production Order along with other components. Goods Issue documents are posted during confirmation of the Prod. Order (CO15).

Please note that the Item Category “K” has to be mentioned to notify that Consignment Material is issued. However, if the relevant Stock Determination Rule is maintained for that material, system will automatically pick the vendor consignment item.

SAP Procurement - Vendor Consignment

Vendor Consignment Stock
This is a special kind of stock which can be viewed under SAP inventory transaction MMBE but it belongs to the vendor. As per the need, the company withdraws stock from Vendor Consignment Stock, which results in change of ownership of stock. At this stage, the stock is valuated and a liability towards the vendor is raised.

When a consignment stock is received from the vendor, it can be designated as one of the following stock type:
  • Unrestricted-use stock
  • Quality inspection stock
  • Blocked stock

Stock can be withdrawn from the Vendor Consignment Stock only if it is under Unrestricted-use stock.

SAP Transaction Flow:

  • Create a Purchase Info Record for Material Vendor combination (ME11) with info category as consignment.
  • Create a Purchase Order with Item Category as “K” for consignment item. This ensures that a Goods Receipt to this purchase order results in vendor consignment stock and an invoice can not be posted based on Goods Receipt alone. The net price of the PO is usually zero.
  • Goods Receipt based on the purchase order. The stock can be either,
    1. Unrestricted-use stock
    2. Quality inspection stock
    3. Blocked stock
  • Stock Withdrawal
    T Code – MIGO
    1. Transfer Posting – Others - Movement Type = 411
    2. Enter Material, Quantity, Vendor, Plant etc.
    3. Check and Post the document
  • Stock Settlement
    Consignment settlement T Code – MRKO

Master Data Settings

  • Special procurement type = 10 for consignment stock. This material master setting will result in a warning message when a purchase order is created without item category as “K”
  • Purchase Info Record for a consignment purchase is mandatory. The price for vendor consignment stock is picked up from purchase info record.

Consignment Stock Reports

  • MMBE – Stock Overview : Company Code / Plant / Storage Location / Batch
  • MB54 – Display Consignment Stocks

Note:

  • An alternate way to SAP transaction flow could be when Goods Receipt is made without reference to a purchase order using movement type 501 K.
  • Material can also be issued to a cost center directly instead of a 2 step process of withdrawal and then issue to a cost center. The Movement type would be 201 K. Refer Goods Issue from Inventory to Cost Center (Manufacturing Consumption)
  • An accounting document is generated only during stock withdrawal. The price is picked up from Consignment Info Record. During Goods Receipt no accounting document is generated.

Also see links:
Stock Determination
Stock transfer from Quality Inspection (QI) to unrestricted use

How to create New Movement Type

Inventory Management - New Movement Type

Transaction – OMJJ

Menu path – SPRO>Material Management> Inventory Management > Movement types > Copy, Change Movement types

SAP Configuration Steps

  • Select a standard movement type which is very close to the requirement.
  • Select the standard movement type and click on Copy
  • Enter the new movement type to which it is to be copied. The new movement type should either be in 9** form or Z** form.
  • Click on “Copy All” when a pop up window appears which says “the entry to be copied has dependant entries”.
  • Update the entries in the “Details” screen and then maintain all the different views for a new movement type.
  • Short texts – here you can maintain transaction short text for different languages.
  • Allowed transactions – a list of transactions can be maintained which are allowed to post this movement type.
  • Help texts – this text will be visible to the user when he presses F1 for help. It can be maintained in different languages.
  • Field Selection – Over here required and optional entry fields can be maintained. The fields are grouped into logical groups like Account Assignment, Material Management etc. Based on the group, a desired field can be selected. This field can then be suppressed, made a required entry or an optional entry based on the radio button selection.
  • Update Control – This is applicable is Warehouse Management is active. The settings in this tab provide the reference movement type for Warehouse Management.
  • Account Grouping – In this screen you can maintain the account modification keys. The account modification key is to differentiate account determination for the goods movement. The values of this key are SAP predefined and cannot be changed.
  • Reversal / follow on movement – Over here you can maintain the movement type for reversal movement. By Indicator type of posting in this screen, the system decides whether the quantity adopted from the reference document (which is getting reversed based on this movement type) may be changed or not.
  • Reason for movement – Over here you can define which reasons are allowed while posting the mentioned movement type. This field is usually used to differentiate the different scenarios (for reporting purpose) in which the said movement type can be used. The movement type configuration for Field Selection can be used to determine if this is a mandatory or an optional field while posting the document.
  • Deactivate QM inspection – By this setting you can configure the instances when this movement type is used and Quality Management is not active. As a result no inspection lots will be created for an inspection process.
  • LIS statistics group – Over here different statistic groups can be maintained for different possibilities of this movement type.

Movement Type – Interface between WM and IM module

Steps:

  • Idenfify the relevant warehouse management movement type which is to be linked with the given Inventory Management movement type. If an appropriate Warehouse Management movement type does not exist, you will have to create one.
  • Maintain the link between the Inventory Management Movement type and Warehouse Management movement type.

Menu Path:
SPRO> Logistics Execution> Warehouse Management> Interfaces> Inventory Management> Define movement types
Select “Assign WM Movement Type References to IM Movement Types”

In this screen on the left all IM movement types are populated. For all these movement types a reference WM movement type is entered under column “Reference Movement type WM”. If a new IM movement type was created copying a standard movement type, the reference WM movement type will also get copied accordingly. In some cases it would be required then to change this reference movement type with some other movement type.

Note: this setting is required if warehouse management is active.

Tuesday, July 29, 2008

SAP Procurement - Subcontracting

Subcontracting is one of the manufacturing strategy by which a company decides to outsource some or all of its production operations to a vendor. This process is considered better than a complete external procurement as there can be a tighter control on the product quality.

In a typical subcontracting process, a manufacturing company provides raw materials / components (say material A and B) to a subcontracting vendor. The vendor in turn processes these materials to turn them into an end product (say material C). This product (if not a finished product) is then used by the manufacturing company to carry out the rest of the operations to turn it into a finished product.

Standard SAP supports this process. To achieve this, a subcontracting purchase order for material C is created. Material A and B which constitute the Bill of Material (BOM) of material C are then delivered to the subcontracting vendor. Finally a Goods Receipt is posted when material C is received from the vendor.

SAP process flow:

1. Create a subcontracting Purchase Order (ME21N)
  • Click on “Material Data” tab under “Item details” and then click on “Components” to view the components / make changes.
  • Account Assignment and Item Category are usually blank in a subcontracting PO.
2. Delivery of components to subcontracting vendor (ME2O)
  • Enter selection parameters like vendor and plant and click on Execute.
  • Select the desired line, click on Create Delivery and a delivery will be created.
3. Post Goods Issue (VL02N)
  • The movement type is usually 541.
4. Post Goods Receipt (MIGO)

5. Logistics Invoice Verification (MIRO)

Master Data Setting:
1. Material Master (MM01)
  • Maintain special procurement key for subcontracting in MRP 2 view.
2. Bill of Material (CS01)
  • If a material needs to be returned by the vendor after the subcontracting process is complete, it should be entered as a negative quantity in the Bill of Material (BOM).
Points to Note:
1. A material can be sent for subcontracting at any stage in the manufacturing process
2. Material to be received after subcontracting should have a different material code, than the components issued.
3. Routing can be used for external processing but not subcontracting.
4. MIGO – Transfer Posting (Mvt type 542) can be used to transfer scrap component back to the manufacturing location.